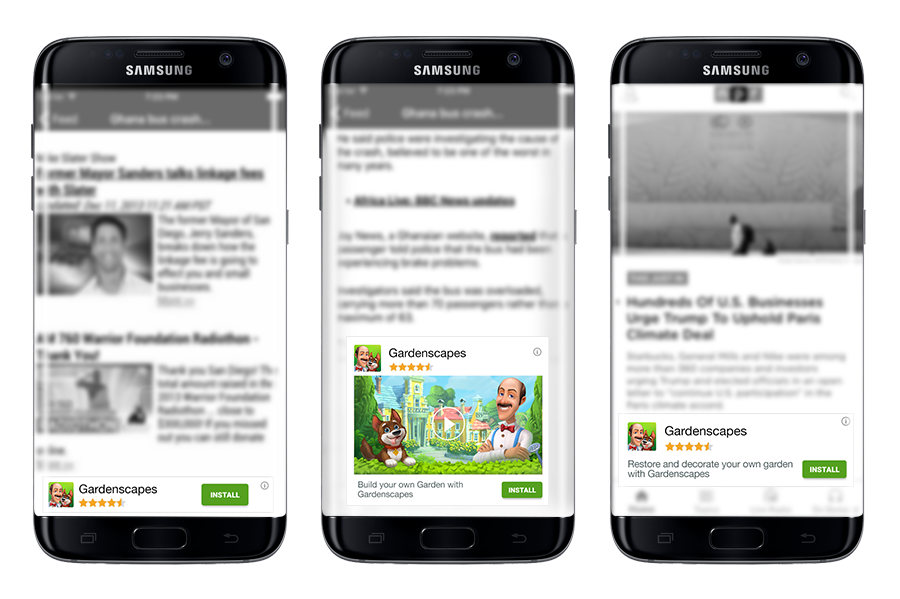
Banners
Appnext Android SDK - Banners ad unit
Ad Unit Integration
SDK Installation
Make sure to Install the SDK in your Android Studio project as described here
Step 1 – Initialize the SDK
Initialize the SDK whenever your app is loaded. Add the following code to your app's main activity
Appnext.init(context);
New! Get the predicted ECPM value before loading the ad. Check out Appnext solution for in-app header bidding here.
Step 2: Add the BannerView to the layout XML
<com.appnext.banners.BannerView
       xmlns:ads="http://schemas.android.com/apk/res-auto"
       android:id="@+id/banner"
       android:layout_width="wrap_content"
       android:layout_height="wrap_content"
       ads:bannerSize="BANNER"
       ads:placementId="YOUR_APPNEXT_PLACEMENT_ID"/>
Available sizes for the bannerSize
| Banner Name | Banner Size |
|---|---|
| "BANNER" | 320x50 |
| "LARGE_BANNER" | 320x100 |
| "MEDIUM_RECTANGLE" | 300x250 |

Banner Sizes
Make sure to provide a valid Appnext placement id for the placementId field
You can also create the view via the code itself:
BannerView banner = new BannerView(this);
banner.setPlacementId("YOUR_APPNEXT_PLACEMENT_ID");
banner.setBannerSize(BannerSize.BANNER);
- Make sure to make the banner available in the view hierarchy
- Make sure to set the Appnext placement id once, per each banner, using either the layout xml or by using the code (but not both)
Step 3: Load the Banner
BannerView bannerView = (BannerView) findViewById(R.id.banner);
bannerView.loadAd(new BannerAdRequest());
Step 4: Configure the BannerAdRequest (Optional)
By default, the banner settings will be loaded with pre-defined settings. You can change these settings by defining the BannerAdRequest object
Setters that are relevant to all banner sizes:
setCategories- String. Set preferred ad categoriessetSpecificCategories- Set specific ad categoriessetPostback- String. Postback parameters that will be posted to your server after user installed an app (make sure to encode the values)
Setters that are relevant only to the MEDIUM_RECTANGLE banner size:
setCreativeType- The MEDIUM_RECTANGLE size can show video in addition to static creative. When video is in use, the file will be streamed (default value isALL- managed by Appnext)BannerAdRequest.TYPE_ALLBannerAdRequest.TYPE_VIDEOBannerAdRequest.TYPE_STATIC
setAutoPlay- Boolean. When a video is set as the creative, this setter defining if the video will auto play or not (default value is false)setMute- Boolean. When a video is set as the creative, this setter is defining if the video will start on muted volume or not. Un-mute/Mute button is located on the video creative. (default value is true - video is muted)setVideoLength- When a video is set as the creative, this setter is defining the preferred length of the video. (default value is SHORT)BannerAdRequest.VIDEO_LENGTH_SHORT- Up to 15 seconds long videosBannerAdRequest.VIDEO_LENGTH_LONG- 20-60 seconds long videos
// All sizes example
BannerAdRequest banner_request = new BannerAdRequest();
banner_request
       .setCategories("category1, category2")
       .setPostback("Postback string");
// ...
bannerView.loadAd(banner_request);
// MEDIUM_RECTANGLE size example
BannerAdRequest banner_request = new BannerAdRequest();
banner_request
  .setCategories("category1, category2")
  .setSpecificCategories("category1, category2")
  .setPostback("Postback string")
  .setCreativeType(BannerAdRequest.TYPE_VIDEO)
  .setAutoPlay(true)
  .setMute(false)
  .setVideoLength(BannerAdRequest.VIDEO_LENGTH_SHORT);
// ...
Step 5: Callbacks (Optional)
You can receive client-side callback from the banner by using the “BannerListener” object
bannerView.setBannerListener(new BannerListener() {
   @Override
   public void onError(AppnextError error) {
       super.onError(error);
   }

   @Override
   public void onAdLoaded(String s,AppnextAdCreativeType creativeType) {
       super.onAdLoaded(s,creativeType);
   }

   @Override
   public void adImpression() {
       super.adImpression();
   }

   @Override
   public void onAdClicked() {
       super.onAdClicked();
   }
});
onAdLoaded(String BannerID)- The banner was successfully loaded, and its ready to be shown to the user (String s = banner ID)AdImpression- The banner was viewed by the user, and an impression was reported to AppnextonAdClicked- The banner was clicked by the useronError- An error has occurred. The following errors codes are passed in the onError callback.
(Using theBannersErrorobject);NO_ADS,CONNECTION_ERROR,TIMEOUT,NO_MARKET,INTERNAL
@Override
public void onError(AppnextError error) {
   switch (error) {
       case BannersError.CONNECTION_ERROR:
           Log.v("appnext", "client connection error");
       case BannersError.NO_MARKET:
           Log.v("appnext", "couldn't open a valid market")
       case BannersError.TIMEOUT:
           Log.v("appnext", "connection time out client")
       case BannersError.NO_ADS:
           Log.v("appnext", "server - no ads");
			case BannersError.INTERNAL_ERROR:
	    		 Log.v("appnext", "Internal error");
     	default:
           Log.v("appnext", "other error");
   }
   super.onError(error);
}
Step 6: Finalize Appnext
Add the following code when you destroy your Activity
@Override
public void onDestroy() {
	super.onDestroy();
	banner.destroy();
}
Example Project
You can download an example project (Android Studio) from our Github page here.
App Categories
| 1. Action 2. Adventure 3. Arcade 4. Arcade & Action 5. Board 6. Books & Reference 7. Brain & Puzzle 8. Business 9. Card 10. Cards & Casino 11. Casino 12. Casual 13. Comics 14. Communications 15. Education 16. Educational 17. Entertainment 18. Family 19. Finance 20. Health & Fitness 21. Libraries & Demo 22. Lifestyle | 23. Live Wallpaper 24. Media & Video 25. Medical 26. Music 27. Music & Audio 28. News & Magazines 29. Personalization 30. Photography 31. Productivity 32. Puzzle 33. Racing 35. Shopping 36. Simulation 37. Social 38. Sports 39. Sports Games 40. Strategy 41. Tools 42. Travel & Local 43. Trivia 44. Weather 45. Word |
Make sure to encode (%20) categories with more than 1 word, example: Travel%20%26%20Local
Integration Support
Should you have any problems integrating the product, log a ticket with us by emailing [email protected]
Updated almost 5 years ago