Banners
Appnext Mopub adapter - Banners ad unit
Adding Appnext Banners to Mopub
Step 1: Login to your MoPub account and configure Appnext
As explained above, you must have a Mopub account, and an associated app within this account, in order to integrate Appnext
Step 2: Select your app and click to monetize it
- Within your MoPub account, press the ‘Apps’ tab

- Appnext must be integrated as a custom event of "banner' ad unit. If your app does not have a banner ad unit yet, you should create a new ad unit by clicking on your app’s name:

- After clicking on your app’s name, you will need to click the “New ad unit” button

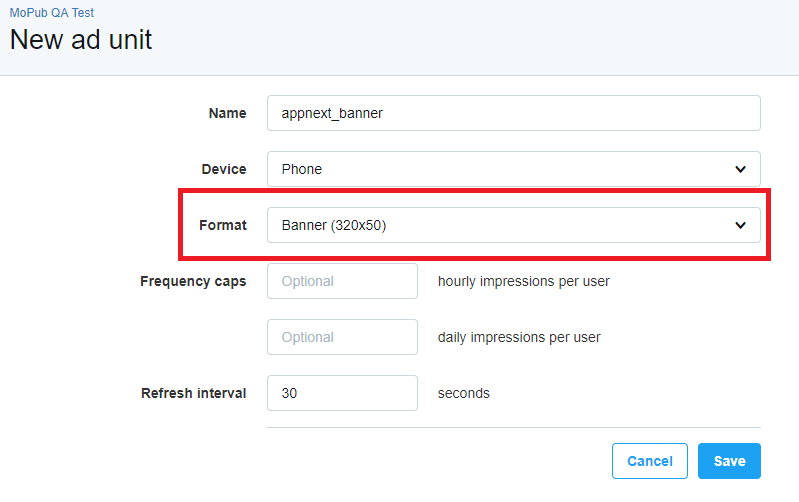
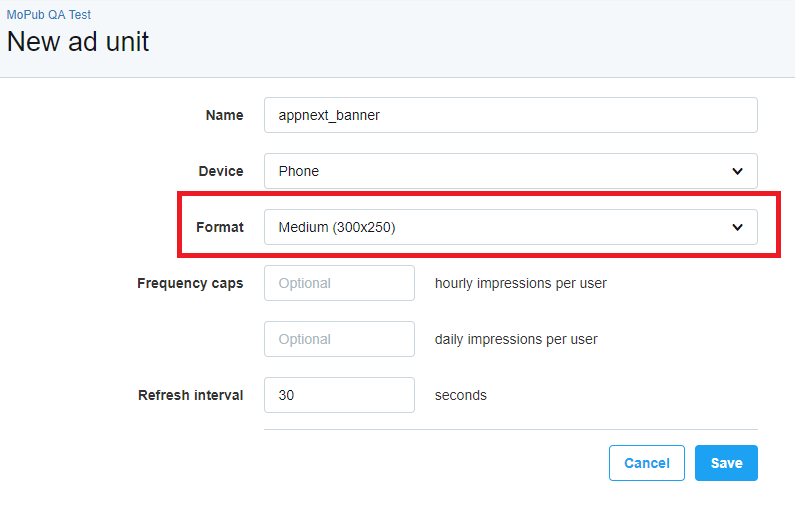
Provide a name for your new ad unit and choose your target device type (Phone or Tablet). After making the device type selection, you should choose the following format to fit the banner size:
- Format - For Appnext Banner 320x50 and Appnext large banner (320x100) choose "Banner (320x50)", for Appnext Medium Rectangle, choose "Medium 300x250"


- Frequency cap - optional, but not recommended
- Refresh Intervals - optional, but not recommended
Don't forget to click the “Save” button
Step 3: Configure Appnext as a network (if you haven’t done it in the past)
You will to configure Appnext as an ad network and associate it with your Ad Unit.
- Click on the “Networks” tab

- Click on the “New network” button:
- Select “Custom SDK network”:
- Set up the Custom SDK Network:
Network name - enter a name for the new network: “Appnext”
- Set Up Your Inventory as described:
- Click next to find your app and the newly created banner ad unit
- Add the following class to the "CUSTOM EVENT CLASS" section (2nd cube in the line)
com.appnext.sdk.adapters.mopub.banners.AppnextMoPubCustomEventBanner
- It is mandatory to add your Appnext placement ID, and the banner size to the "CUSTOM EVENT CLASS DATA" section (the right cube in the line).
{
   "AppnextPlacementId":"YOUR_PLACEMENT_ID_HERE",
   "AppnextBannerSize":"BANNER"
}
{
   "AppnextPlacementId":"YOUR_PLACEMENT_ID_HERE",
   "AppnextBannerSize":"LARGE_BANNER"
}
{
   "AppnextPlacementId":"YOUR_PLACEMENT_ID_HERE",
   "AppnextBannerSize":"MEDIUM_RECTANGLE"
}
- It is optional to configure the banner ad unit from Mopub's dashboard. Please note that any client-side configuration (from your code) will override these settings
For Banner and Large Banner;
{
    "AppnextPlacementId": "YOUR_PLACEMENT_ID_HERE",
    "AppnextBannerSize": "CHOOSE_YOUR_SIZE",
    "AppnextCategories": "Action",
    "AppnextPostback": "Your_Postback"
}
For Medium Rectangle
{
  "AppnextPlacementId": "YOUR_PLACEMENT_ID_HERE",
  "AppnextBannerSize": "MEDIUM_RECTANGLE",
  "AppnextCategories": "Action",
  "AppnextPostback": "Your_Postback",
  "AppnextMute": "false",
  "AppnextAutoPlay": "true",
  "AppnextVideoLength": "15",
  "AppnextCreativeType": "video",
  "AppnextClickEnabled": "true"
}
Please see below for more information about the above keys
Step 4:Create / edit your App’s ad unit’s segment
- In order for Appnext ads to appear in your ad unit, you must set a priority for Appnext ads, by creating a segment and configure Appnext’s eCPM accordingly.
- Go to the “Segments” tab:

- Go to “Global Segments”:

- Click on your Ad Unit (under your app) and set the eCPM for the Appnext network
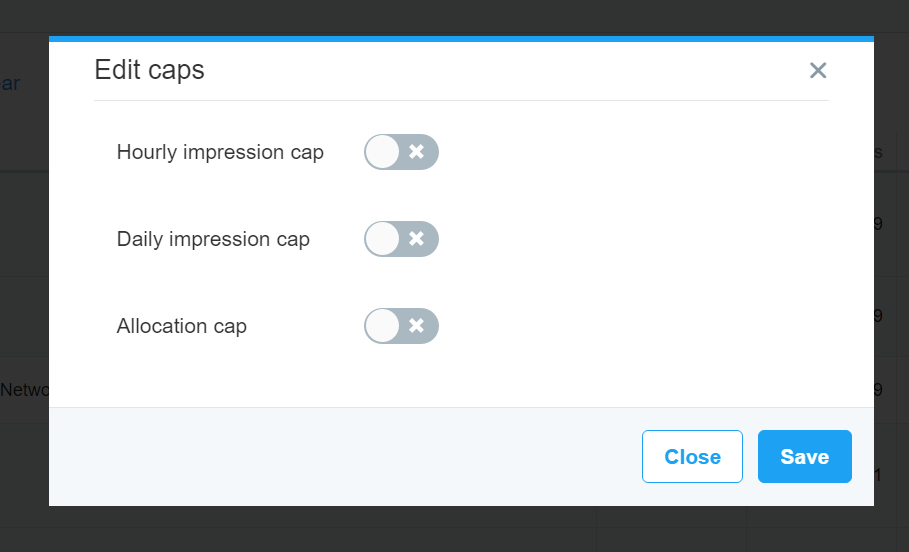
- Set the Frequency Caps:
- Hourly Impression Cap (optional)
- Daily Impression Cap (optional)
- Allocation Percentage (optional)
- Click the "Save" Button!

Step 5: You're Done!
- Your MoPub SDK should start showing Appnext ads immediately. If Appnext ads are not shown, check the eCPM allocation and make sure it’s high enough so it will give Appnext priority.
- Important Note - each placement has a Placement ID. If you integrate multiple placements, you will need to use a different Placement ID for each.
Customizing the ad unit
The Appnext Mopub adapter provides an option to change the ad unit’s configuration in your code, prior to loading the ad via Mopub's functions.
In order to configure the banner ad unit, you should create a 'BannerAdRequest' object for the banner ad and call any of the following setters before loading the ad by the Mopub loadAd interface;
Relevant to all banner sizes:
BannerAdRequest config = new BannerAdRequest();
config.setCategories("category1, category2");
config.setPostback("Postback string");
Relevant to the MEDIUM_RECTANGLE size only
config.setCreativeType(TYPE_VIDEO);
config.setAutoPlay(true);
config.setMute(false);
config.setVideoLength(VIDEO_LENGTH_SHORT);
setCategories- String. Set preferred ad categories (AppnextCategorieswhen using Mopub server-side configuration)setPostback- String. Postback parameters that will be posted to your server after user installed an app (AppnextPostbackwhen using Mopub server-side configuration)
(make sure to encode the values)
Setters that are relevant only to the MEDIUM_RECTANGLE banner size:
setCreativeType- The MEDIUM_RECTANGLE size can show video in addition to static creative. When video is in use, the file will be streamed. The default value isALL. (AppnextCreativeTypewhen using Mopub server-side configuration)BannerAdRequest.TYPE_ALL("all")BannerAdRequest.TYPE_VIDEO("video")BannerAdRequest.TYPE_STATIC("static")
setAutoPlay- Boolean. When a video is set as the creative, this setter defining if the video will auto play or not. The default value is false. (AppnextAutoPlaywhen using Mopub server-side configuration)setMute- Boolean. When a video is set as the creative, this setter is defining if the video will start on muted volume or not. Un-mute/Mute button is located on the video creative. The default value is true - video is muted. (AppnextMutewhen using Mopub server-side configuration)setVideoLength- When a video is set as the creative, this setter is defining the preferred length of the video. The default value is SHORT. (AppnextVideoLengthwhen using Mopub server-side configuration)BannerAdRequest.VIDEO_LENGTH_SHORT("15") - Up to 15 seconds long videosBannerAdRequest.VIDEO_LENGTH_LONG("30") - 20-60 seconds long videos
Example of how to push the client-side config into Mopub interface
private MoPubView moPubView;
private Map<String, Object> extras;
//...
BannerAdRequest config = new BannerAdRequest();
config.setCategories("category1, category2");
config.setPostback("Postback string")
config.setCreativeType("TYPE_VIDEO");
config.setAutoPlay(true);
config.setMute(false);
config.setVideoLength("VIDEO_LENGTH_SHORT");

extras = new HashMap();
extras.put(AppnextMoPubCustomEventBanner.AppnextConfigurationExtraKey, config);
moPubView.setLocalExtras(extras);
moPubView.loadAd();
Client Side vs. Server Side
Please note that any client-side configurations (in your code), will override the Mopub's server-side settings
App Categories
| 1. Action 2. Adventure 3. Arcade 4. Arcade & Action 5. Board 6. Books & Reference 7. Brain & Puzzle 8. Business 9. Card 10. Cards & Casino 11. Casino 12. Casual 13. Comics 14. Communications 15. Education 16. Educational 17. Entertainment 18. Family 19. Finance 20. Health & Fitness 21. Libraries & Demo 22. Lifestyle 23. Live Wallpaper | 24. Media & Video 25. Medical 26. Music 27. Music & Audio 28. News & Magazines 29. Personalization 30. Photography 31. Productivity 32. Puzzle 33. Racing 34. Role Playing 35. Shopping 36. Simulation 37. Social 38. Sports 39. Sports Games 40. Strategy 41. Tools 42. Travel & Local 43. Trivia 44. Weather 45. Word |
Make sure to encode (%20) categories with more than 1 word, example: Travel%20%26%20*Local
Integration Support
Should you have any problems integrating the product, log a ticket with us by emailing [email protected].
Updated almost 8 years ago