Interstitial
Appnext Mopub adapter - Interstitial ad unit
Before you begin!
Make sure that you have completed the iOS Mopub Adapter installation before you begin integrating the Interstitial ad unit
Integrating the Interstitial ad unit
Step 1: Add import statement
Add the following import statement in your pre-compiled header. If your application is written in swift add it to your bridging-header.
#import <AppnextMoPubAdapter/AppnextMoPubAdapter.h>
Step 2 (optional): Additional configuration
Advanced ad unit configuration
The Appnext SDK provides an option to change the ad unit’s configuration.
By default, the SDK configuration will be loaded from Appnext's server, but you can choose to change it by
- creating a class that inherits from AppnextMoPubCustomEventInterstitial
- override the - (AppnextAdConfiguration *) getAdConfiguration method
- returning an AppnextInterstitialAdConfiguration object.
An example of how to do that can be found in the loadCustomisedInterstitial method of the example projects.
@implementation CustomisedAppnextMoPubCustomEventInterstitial
- (AppnextAdConfiguration *) getAdConfiguration
{
    AppnextInterstitialAdConfiguration *configuration = [[AppnextInterstitialAdConfiguration alloc] init];
    configuration.categories = @"Action";
    configuration.postback = @"MyPostbackParams";
    configuration.buttonText = @"Install";
    configuration.buttonColor = @"#ffffff";
    configuration.creativeType = ANCreativeTypeManaged;
    configuration.skipText = @"Skip";
    configuration.autoPlay = YES;
    configuration.autoPlay = YES;
    configuration.preferredOrientation = kPreferredOrientationTypeStringAutomatic;
    return configuration;
}
@end
List of configuration options:
Button Text:
The install button's text (default is "Install")
Button Color:
The install button's color - a 6 hex chars starting with # (default is "#6AB344")
Skip button Text:
Set a custom text for the "skip" button (default is "Skip")
Category:
Set preferred ad categories
Click in-app
Determines the App Store loading method, when set to "YES" - the App Store will open "in-app" within the running app, Otherwise the App Store will open outside the running app
Install Postback:
Postback parameters that will be posted to your server after user installed an app (make sure to encode the values)
Auto Play:
Set video auto-play (default is "YES")
- YES
- NO
Creative Type:
Set creative type for the main section of the Interstitial (default "ANCreativeTypeManaged")
- ANCreativeTypeNotSet
- ANCreativeTypeManaged
- ANCreativeTypeVideo
- ANCreativeTypeStatic
Preferred Orientation:
Set the preferred orientation if both landscape and portrait are supported by the application (default is kPreferredOrientationTypeStringAutomatic)
- kPreferredOrientationTypeStringAutomatic = @"automatic"
- kPreferredOrientationTypeStringLandscape = @"landscape"
- kPreferredOrientationTypeStringPortrait = @"portrait"
- kPreferredOrientationTypeStringNotSet = @"not_set"
Step 3: Login to your MoPub account and configure Appnext
As explained above, you must have a MoPub account, and an associated app within this account, in order to integrate Appnext.
Step 4: Select your app and click to monetize it
- Within your MoPub account, press the 'Apps’ tab. Create a new app and add a new ad unit
- Appnext must be integrated as a custom event of a fullscreen interstitial ad unit (landscape / portrait). If your app does not have a fullscreen interstitial set, you should create a new ad unit by clicking on your app’s name:

- After clicking on your app’s name, you will need to click the “Add an Ad Unit” button:

- Define your Ad Unit, by selecting the following:
- Device - select a device type (Phone / Tablet)
- Format - select “Fullscreen 320 x 480”
- Name - enter a name for your ad unit
- Layout - choose “Portrait” or “Landscape” according to your app orientation
- Frequency cap - optional, but not recommended
Click the “Save” button
Step 5: Configure Appnext as a network (if you haven’t done it in the past)
You will to configure Appnext as an ad network and associate it with your Ad Unit.
- Click on the “Networks” tab
-
Click on the “New network” button:
-
Select “Custom SDK network”:
- Set up the Custom SDK Network:
Name - enter a name for the new network: “Appnext”
- Set Up Your Inventory as describe:
i. Scroll down to find your app
ii. Under your app, find your Fullscreen Interstitial Ad Unit (same ad unit that was created on step 5)
iii. Add the following class to the “CUSTOM EVENT CLASS” section [- 2nd cube in the line ]:
AppnextMoPubCustomEventInterstitial
iv. Add your app’s Placement ID (available on the Appnext platform) to the “CUSTOM EVENT CLASS DATA” section:
{"AppnextPlacementId":"YOUR_PLACEMENT_ID_HERE"}
The data in this section should be in JSON format.
v. Configure Appnext’s Interstitial from the server (optional):
You can configure several elements in the Appnext Interstitial, without editing your client-side integration, by passing their values in the “CUSTOM EVENT CLASS DATA” section:
{"AppnextPlacementId":"YOUR_PLACEMENT_ID_HERE","AppnextButtonText":"Install","AppnextButtonColor":"#6AB344","AppnextCategories":"Action","AppnextPostback":"Your_Postback","AppnextCreativeType":"managed","AppnextSkipText":"Skip","AppnextAutoPlay":"true","AppnextOrientation":"not_set","AppnextClickInApp":"YES"}
Configuring the Ad Unit on this section, will overwrite the default and custom ad unit configuration, set in the client-side integration step.
Step 6: Create / edit your App’s ad unit’s segment
In order for Appnext ads to appear in your ad unit, you must set a priority for Appnext ads, by creating a segment and configure Appnext’s eCPM accordingly.
- Go to the “Segments” tab:

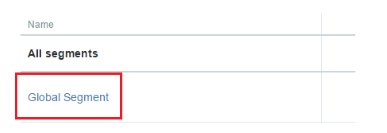
- Go to “Global Segments”:

- Click on your Ad Unit (under your app) and set the eCPM for the Appnext network

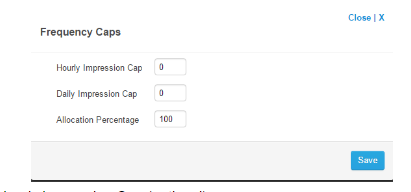
- Set the Frequency Caps:
a. Hourly Impression Cap (optional)
b. Daily Impression Cap (optional)
c. Allocation Percentage (optional)
Click the “Save” button

Step 7: You’re all done!
Your MoPub SDK should start showing Appnext ads immediately.
If Appnext ads are not shown, check the eCPM allocation and make sure it’s high enough so it will give Appnext priority.
Important Note
- Each placement has a Placement ID. If you integrate multiple placements, you will need to use a different Placement ID for each.
- It is against our policies to encourage or reward the user for installing the app; we only allow rewards as a means of encouraging users to watch the video ad, so they will voluntarily install the app if they are interested.
App Categories
| 1. Action 2. Adventure 3. Arcade 4. Board 5. Books 6. Business 7. Card 8. Casino 9. Catalogs 10. Dice 11. Education 12. Educational 13. Entertainment 14. Family 15. Finance 16. Food & Drink 17. Graphics & Design 18. Health & Fitness 19. Kids | 20. Lifestyle 21. Medical 22. Music 23. Navigation 24. News 25. Photo & Video 26. Productivity 27. Puzzle 28. Racing 29. Reference 30. Role Playing 31. Simulation 32. Social Networking 33. Sports 34. Strategy 35. Travel 36. Trivia 37. Utilities 38. Weather |
Make sure to encode (%20) categories with more than 1 word, example: Travel%20%26%20Local
Integration Support
Should you have any problems integrating the product, log a ticket with us by emailing [email protected].
Updated over 7 years ago